Notifications
Notification center
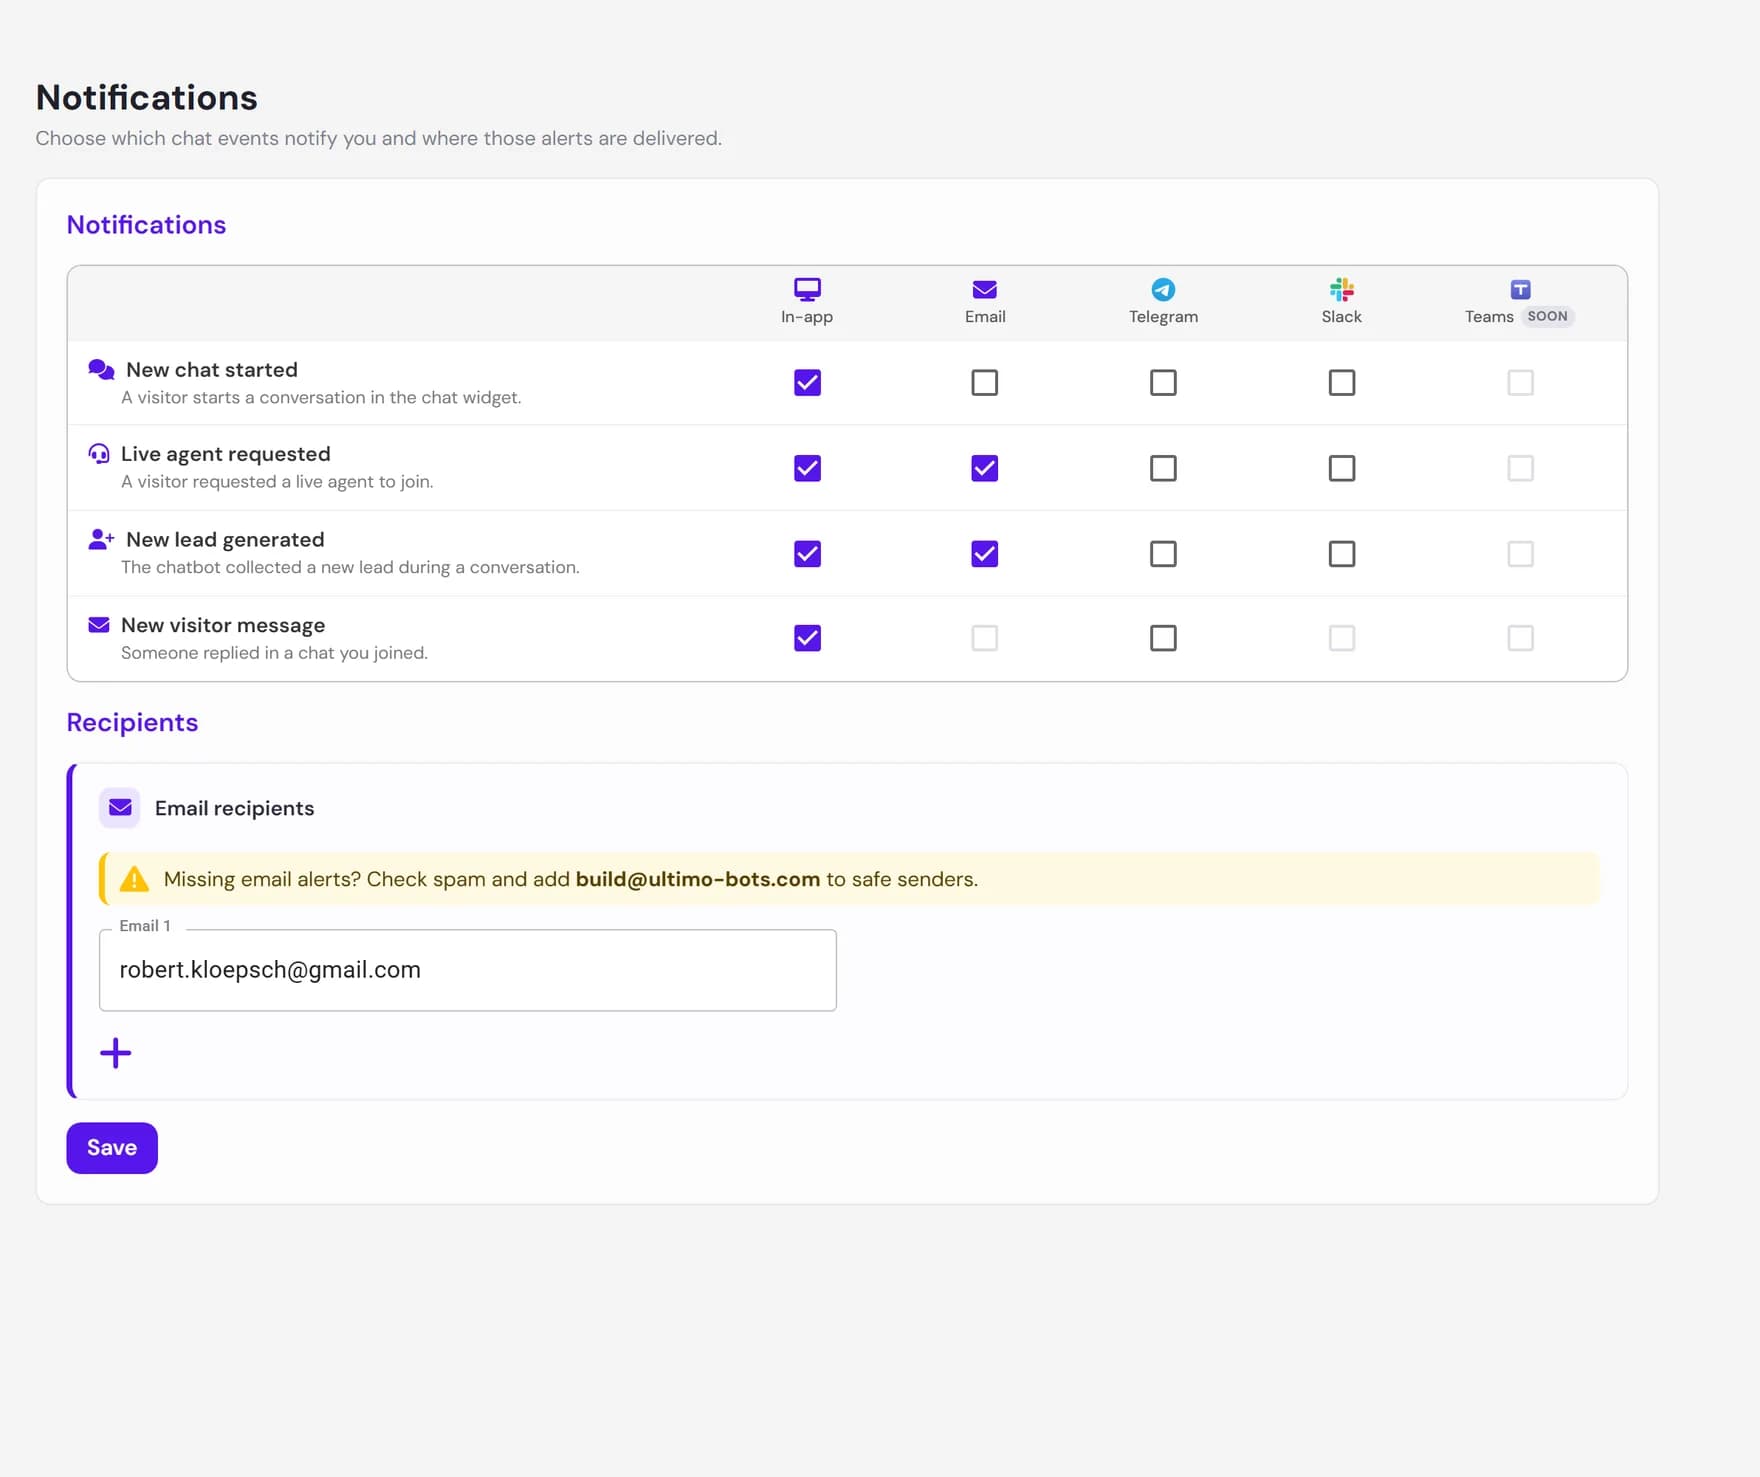
The Notification Center decides who hears about what. Pick the conversation events that matter to your team, such as a visitor asking for a human or a new lead, and choose whether each one shows up in the dashboard, lands in an inbox, or both.
Notifications are configured per agent. Open an agent, go to its Notifications settings, and you get a single grid: each row is an event, each column is a delivery channel. Tick a box to turn that alert on. Your AI agent keeps answering visitors on its own. Notifications are how a person on your side finds out when a conversation needs a human, or when a lead is worth following up.
Which events can alert you
There are four events you can be notified about. Three come from live chat conversations, and one comes from lead capture:
- New chat started. A visitor opens a conversation in the chat widget. Useful if you like to watch conversations as they begin.
- Live agent requested. A visitor asks to speak to a human (for example by clicking the Talk to a human button). This is the most time-sensitive event, because someone is waiting for a reply.
- New visitor message. Someone replied in a chat you have already joined. This keeps you in the loop on conversations you are actively handling.
- New lead generated. Your agent collected a new lead during a conversation, such as a name, email, or phone number from the visitor.
Where alerts are delivered
Each event can be delivered through one or more channels. You choose them independently per event, so a low-priority event can be in-app only while an urgent one also emails you.
- In-app. A pop-up notification inside the dashboard while you are signed in. In-app alerts appear anywhere in the portal, not only on the Live Chat page, so you do not have to keep the inbox open to catch them.
- Email. A message sent to the recipient addresses you set up. Best for alerts you need to see even when nobody has the dashboard open.
Two more channels are available for the events that support them: Telegram and Slack, which deliver the same alerts into a Telegram chat or a Slack channel you connect. A Teams column is shown as coming soon and cannot be selected yet. This page focuses on in-app and email, since those are the channels every event supports and the ones turned on by default.
The default setup
Every new agent is created with notifications already configured, so alerts work on day one without any setup. In-app alerts are switched on for all four events. Email is switched on only for the two events most worth interrupting your day: a visitor asking for a human, and a new lead. The table below shows exactly how a brand-new agent is configured.
| Event | In-app (default) | Email (default) |
|---|---|---|
| New chat started | On | Off |
| Live agent requested | On | On |
| New visitor message | On | Not available |
| New lead generated | On | On |
When an agent is created, the account owner's email is also pre-filled as a recipient, so the default email alerts have somewhere to go straight away. You can change any of this at any time. Nothing is locked in.
Setting recipient emails
As soon as you turn on email for any event, a Recipients area appears so you can say where those emails should go. The email list is shared across every event that uses email, so you maintain one list of people rather than repeating addresses per event.
Turn on email for an event
Tick the Email box for at least one event in the grid. The recipient fields only show up once email is in use somewhere.
Add one or more addresses
Type an email address into the recipient field. Click the add button to add another row, or remove a row you no longer need. Every address you keep must be a valid email, or the page asks you to fix it before saving.
Save your changes
Click Save. If you leave the page with unsaved changes, the dashboard warns you first so nothing is lost by accident.
build@ultimo-bots.com to your safe senders, so future notifications land in your inbox.How notifications connect to live chat and leads
Notifications are the glue between your agent and your team. The events come from two parts of the product, and tuning them is how you control how loud each part is:
- Live chat. Live agent requested and New visitor message are the heartbeat of the live chat experience. When a visitor asks for a human, an alert is how the right person knows to open the inbox and take over from the agent.
- Leads. New lead generated mirrors what shows up in your Leads inbox. Turning on email for this event means a new lead reaches your team even when no one is watching the dashboard.
A practical setup for most teams is to leave the defaults as they are: in-app for everything so you can glance at activity, plus email for the two events that need a fast human response. From there, dial individual channels up or down to match how your team works.
Next steps
Notifications work best alongside the features they alert you about: